
Lesson 5- Height Gages
What You Will Learn
- What height gages measure
- Accuracy and setup requirements
- Shop-floor applications
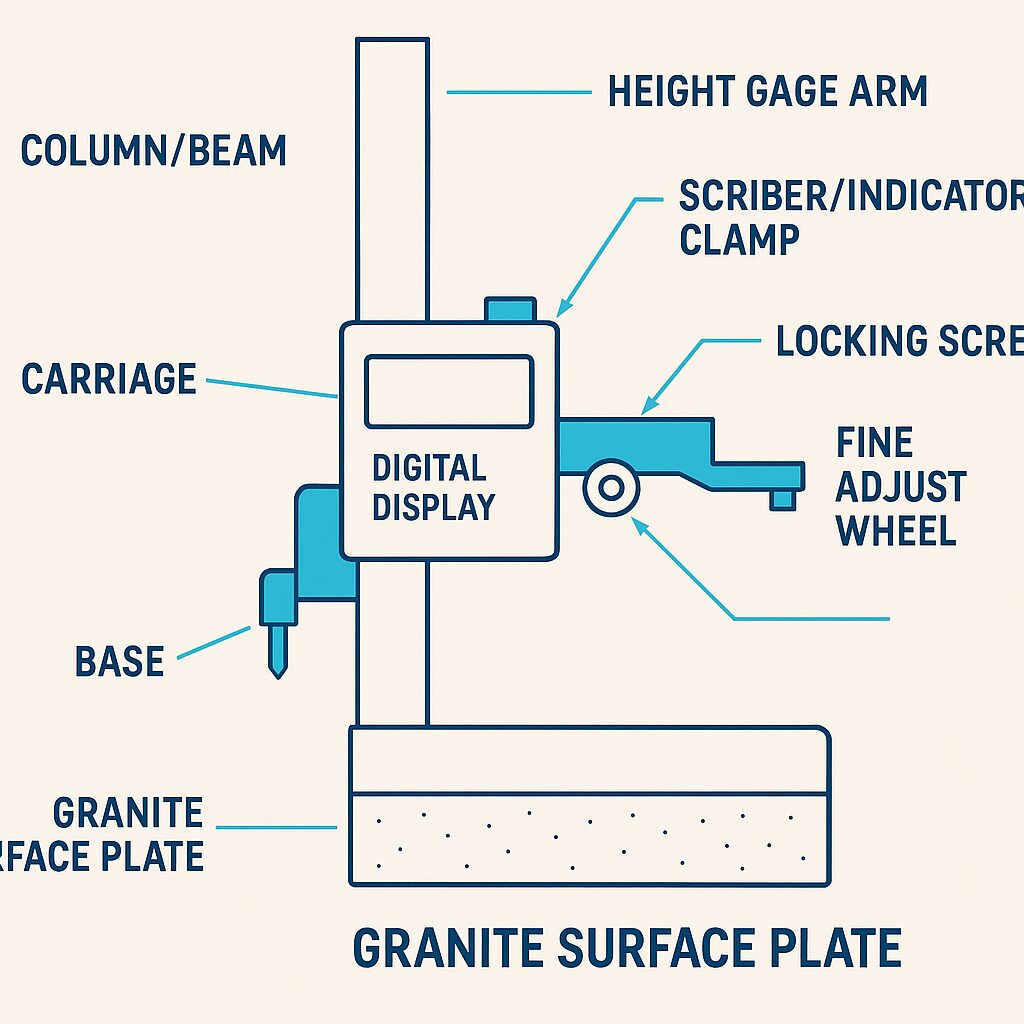
A height gage is a precise vertical measuring tool that slides on a granite surface plate. With a scribe or an indicator tip, it determines how tall something is, how deep a feature goes, or how much a surface sags from a flat reference. Treat the surface plate as perfectly flat ground and the height gage as a smooth-gliding measuring tower.
Height gages are especially helpful for lens work. You can confirm center thickness and sag on convex or concave parts, verify step heights, check recess depths in counterbores or grooves, and lay out accurate lines for secondary operations. Digital readouts reduce reading errors and speed up shop use, while an indicator tip is preferred around optics because it avoids scratching.
 Accurate results depend on a clean, dust-free granite plate, proper zeroing, stable part support, and gentle contact. Always zero to your reference, either the plate or a gauge block, whenever you change the setup. Let parts reach room temperature before critical checks because warm parts expand. Keep the probe vertical and centered over the point of interest to avoid cosine error (angled contact reads short).
Step-By-Step: Measuring Lens Sag
Begin by wiping the plate, the lens, and the contact tip. Place the lens on a stable support such as a clean ring or V-block so it cannot rock. Zero the indicator on the surface plate. Move to the lens rim and lightly touch off to capture the rim height. Move to the optical center and lightly touch off again to capture the crown height. Subtract the rim reading from the crown reading to get sag. Repeat the sequence once to confirm repeatability within a few micrometers.
If the lens rocks, your numbers drift; use a firm, flat support. Grit on the plate lifts either the part or the tip and produces a false high reading; clean first, measure second. Heavy force bends things slightly; use the fine adjustment and just “kiss” the surface. If the tip is not vertical or you are off the true point, you will read low; stay centered and square. Any change to tip, support, or temperature calls for a fresh zero.
Shop-Floor Applications in Optics
Use a height gage to verify center thickness on blanks before and after polishing, confirm sag targets to ensure the radius is trending correctly, check bevel or step heights after edging, and set fixture or tool heights to a known reference during setup.
Park the gage with the tip lifted clear of the plate, lock the carriage when storing, and cover the surface plate when not in use. Avoid using a scribe on finished optical surfaces; switch to an indicator tip for contact.
Quick Practice
Place a 10 mm gauge block on the plate, zero on the plate, and measure the top of the block; the display should read about 10.000 mm with only a few micrometers of variation. Add a thin shim—for example, 0.020 mm—and observe the display increase to roughly 10.020 mm. This simple exercise builds trust that small changes show up clearly.
Why do we zero before every measurement session? Describe two ways a dirty plate can affect a reading. What simple habit helps avoid cosine error? For delicate optics, which tip is safer, scribe or indicator, and why?