
Lesson 2- Cleaning Optical Parts
What You Will Learn
- Importance of immediate cleaning
- Common cleaning agents and techniques
- Typical residues and how to remove them
Freshly polished optics carry a fragile, ultra-smooth surface that is prone to staining and contamination from moisture, chemicals and dust particles. Cleaning must begin as soon as the part leaves the polishing environment. Slurry, pitch particulates, and oxides need to be removed so they do not dry onto the surface. Early cleaning preserves cosmetic quality and ensures the optical surface is suitable for metrology. Time and air flow can make it difficult to remove contaminants from the surface. Polishing slurry when it dries oxidizes with the optical material and can cause permanent stain etching into the surface. Oils from a fingerprint can also cause a chemical reaction on the surface that can permanently etch the surface.
The residues you’ll encounter fall into three broad families that respond to different chemistries. Organic materials, Base (PH>8), Alkaline (PH>8), and Acids (PH<6) It’s always best to use deionized water to mix polishing slurry. Surface cleaning with a lint free wipe is best starting with a gentle sweeping motion with minimal pressure. On the surface of the wipe mix apply Acetone and Methanol before wiping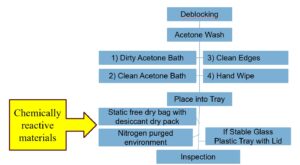 the surface. If soaking the optic for cleaning, use a 2-bath system. First bath of Acetone is the initial “dirty” soak. This is used to remove paints, lacquers, and pitch or wax from the optic. The second “clean” bath will remove the residue from the first. Gentle swabbing of the surface is appropriate to dislodge particulate that may be clinging to the surface.
Slurry residue or moisture spots that have deposited on the surface of the optics respond well to deionized water and lens washes surfactants. Surface treatments powdered calcium carbonate, or commercial lens washes (e.g., Balzers-type) provide mild chemical and mechanical assistance without scratching. Residues from rouge or ceria can leave stain spots on the surface; a brief rinse or wipe with deionized water can reactivate remaining ions before they oxidize on the surface. Using a reapplication of slurry on a cotton swab or wipe can work also.
Technique matters as much as chemistry. Handle parts by the edge with gloved fingertips and keep the optic covered between steps. Let the tissue move the liquid rather than pressing the tissue into the glass; pressure grinds any trapped particles into the surface. Refresh tissues constantly—one touch, one pass, then discard—to avoid redepositing what you just lifted. When using lens-wash slurries or chalk, keep the film extremely thin and time-limited; use lots of DI water, then a solvent to displace water and prevent spots. Clean from the center to the edge of the optic, never wipe edge to edge. Contaminants at the edge of the optic could get trapped in the wipe and get dragged across the optic surface.
Inspection is key to quality. Evaluate the optical surface under bright-field illumination, use a bright light source, look for streaks and spots. Switching to a low-angle dark-field to reveal scatter from retained sleeks. Rotate the part while grazing light across the surface.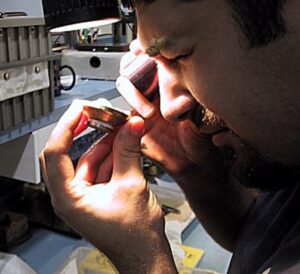
A magnification eye loupe can be used to aid in locating small surface defects; a clean optic shows uniform reflectance, no “comet tail” drag marks or sparkle from holes or residual sub-surface damage. If you see fast-drying islands or rings, the surface is still carrying surfactant or oil, use acetone and methanol together to dissolve and remove the residue. Milky patches after a water rinse indicate minerals or pH imbalance—repeat with fresh DI and follow immediately with acetone and methanol to remove the water and inspect for staining. 
Material compatibility must guide your selections. Fused silica and most crown/flint glasses tolerate the acetone→methanol sequence, but hygroscopic crystals such as CaF₂ and some IR materials prefer short exposures, room-temperature solvents, and faster displacements to avoid micro-pitting. Coated optics demand even more care: avoid any abrasive slurries on functional coatings and confirm with the coating engineer which solvents are permitted. Plastics and adhesive-bonded assemblies may soften in acetone; use reagent-grade isopropanol, methanol or approved lens wash instead.
Environment and consumables determine consistency. Use reagent-grade (≥99.5%) solvents from small, newly opened bottles; water should be 18 MΩ-cm DI. Work on clean mats in a low-dust area with controlled humidity so drying is uniform. Tissues should be optical-grade, low-lint, and free of binders. Label squeeze bottles clearly, keep caps on, and discard anything that appears cloudy or leaves a film on a test coupon. Inspection stations such as laminar flow hoods, with a top-down air flow are best for reducing dust and lint accumulation on surfaces during inspection.
Safety is integral to the process. Acetone and methanol are highly flammable and methanol is toxic; perform all steps with proper ventilation, containers, and PPE, and segregate solvent waste according to your facility plan. Never mix incompatible chemistries in the same bath and never return used solvent to a clean bottle.
Prompt, chemistry-aware cleaning yields a surface that is not only cosmetically acceptable but also metrologically reliable. Be aware of the chemical reactivity of the substrate being cleaned, gentle drag-wipe technique, minimize redepositing debris onto the surface, prevent staining by using the proper chemicals for the substrate. Be patient and thorough during cleaning and inspection to avoid costly reprocessing.